How To Make Kefir Yoghurt
I get commissions for purchases made through links in this post. View our Affiliate Disclaimer.
Making kefir yoghurt requires a little more work than making cream cheese from your kefir. The process, however, is not difficult at all, and you will be very happy with the results!
You will get great tasting kefir yoghurt that still has all the natural pro-biotic goodness, as opposed to store bought yoghurt where the good bacteria have all been destroyed in the interest of lengthening the shelf life of commercial product.
Follow these easy steps to make your own homemade, healthier kefir yoghurt.
The initial steps and equipment is very similar to the ones you would use to make cream cheese from your kefir.
What You Will Need To Make Kefir Yoghurt
You will need the following basic items that you will probably be able to find around your house.
- A fair sized plastic container with a lid – I use an old biscuit container that is 18cm tall and has a diameter of 23cm (see picture below).
- A piece of mutton cloth / cheese cloth big enough to cover the top of your container.
- 2 large elastic bands to secure the mutton cloth in place.
- 1 stainless steel table spoon.
- About 1 litre of fresh kefir – which will make about 500ml of yoghurt.
- (Optional) Some chopped fruit (either fresh fruit, or dried fruit) – about 3 – 4 table spoons.
- (Optional) raw honey – 1 tablespoon per 200ml yoghurt.
- Plastic bowl with a lid to store your kefir yoghurt in the refrigerator.

Step 1 Getting Prepared
Make sure your container is clean. Cover the container with the mutton cloth. Make sure it is not too tight – it should form a shallow hollow in the container. Secure the cloth in place with the 2 elastic bands.

Step 2 Straining The Kefir
Slowly pour the kefir into the centre of the cloth, to within about half to 1cm of the rim of the container.

The liquid, or whey will start to drain our of the kefir through the cloth and collect in the container. The kefir solids, which become the kefir yoghurt, will remain in the cloth.
Step 3 Thicken The Yoghurt To Taste

This is the “hard” part compared to making kefir cream cheese.
Every 15 minutes, use the table spoon to stir the kefir yoghurt in the cloth, scraping the kefir away from the bottom and sides of the cloth. You will notice the yoghurt starts to thicken as the liquid (whey) starts to drain through the cloth and into the container.
Each time you stir the kefir yoghurt, make sure your mix it thoroughly so that the end product will be smooth and creamy.
In between stirrings, put the lid on the container to keep it clean and protect it from pests contaminating your yoghurt.
This process will take about 1 ½ hours depending on how thick you like your yoghurt.
As a rule of thumb, the yoghurt is at the consistency that I prefer when the spoon can stand upright in the yoghurt by itself.

Step 4 Storage
Scoop the your kefir yoghurt out and put it into a plastic bowl in preparation for the refrigerator.
If you prefer your yoghurt as Greek style yoghurt, then you are done at this point. Cover with a lid and store in the fridge.
If you would like to flavour and sweeten your yoghurt then read on …..
Step 5 Flavour and Fruit (optional)

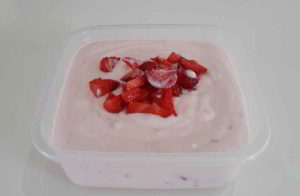
Stir the chopped fruit into the yoghurt – I used chopped fresh strawberries, chopped fresh raspberries and some chopped dried cranberries to make a berry flavoured yoghurt.
Add 1 table spoon of raw honey per 200ml of yoghurt to sweeten. You can add more, or less depending on your taste.
If you cannot get raw honey, then any honey will do, but raw honey still has all the goodness in it, unlike processed honey.
You can now refrigerate your awesome homemade yoghurt!
Use it as a healthy snack or as part of your breakfast. An idea is to serve it for breakfast with some crushed nuts sprinkled over the top.
The final product not only looks fantastic, but is healthy for you too!

Get more posts like this
Subscribe to our mailing list and get interesting homesteading and green living info and updates to your email inbox.
Thank you for subscribing.
Something went wrong.


