Upskill Yourself Learning Blacksmithing
I get commissions for purchases made through links in this post. View our Affiliate Disclaimer.
There are many tasks and projects to be undertaken on a homestead. One of the ways that you can save money, become more self reliant, and get projects done in your own time is to upskill yourself! Our post Upskill Yourself For Self Reliance On The Homestead covers several ways to achieve this. Upskill yourself learning blacksmithing is one of the skills mentioned.
In order to progress on my journey towards self reliance, I recently went on a blacksmithing course to begin adding to my skill set.
I discovered that a well-known South African blacksmith, Neels Van Den Berg, from Black Dragon Forge, operates near where I live. Neels offers courses for beginners as an introduction to blacksmithing. Just what I needed! I booked myself on the course!
Upskill Yourself Learning Blacksmithing – Introduction
The day of the course arrived. We had an early start – 07h45 on a Saturday morning. There were three of us in total on the course which meant we could get individual tutelage from Neels.
We began with the basics, learning about safety and the various tools we would be working with. Anvils, hammers, tongs, forges, quenching oils and steel types were all introduced to us, including things to look for that makes certain equipment better than others.
Getting Down To Heating And Beating
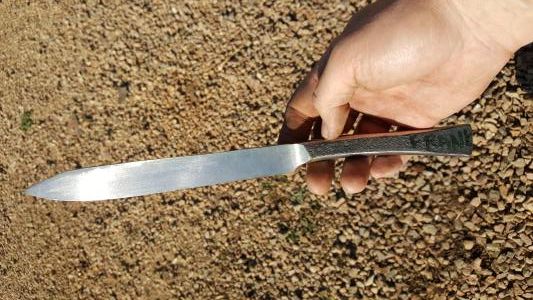
It was now time for the fun stuff! The forges were lit and once they were up to temperature, we put the steel in to heat up. The project for the day would be to forge a carving knife from a piece of round bar stock of 5160 spring steel. Hopefully at the end of the day we would have a functional knife as opposed to a knife shaped chunk of steel!

Once the steel was up to temperature it was time to get going! Neels demonstrated various hammering techniques to move the red hot steel around to achieve the shape we wanted. What was obvious from the demonstration was that hammering would be a skill that would take some time to master! The hammer blows need to be precise and delivered with the right amount of power in order to achieve the correct movement of the steel. It can be likened to trying to have jeweler type precision with a hammer the size of your fist!
Needless to say, Neels made it look easy! Then it was our turn! We started shaping our blades with our mentor giving tips and corrections along the way. We flattened out the round bar and beat the steel into a rough shape, with the required tapers for the blade, bevel and handle. I began to realise that the task to upskill yourself by learning blacksmithing is going to take a lot of practice and patience!
After pounding on the steel with various hammers we had our knives rough forged and it was time to get into the grinding room!

Making it Look Pretty
The next step was to take our rough forged blades and make them look all pretty and shiny! This involved using belt grinders to get rid of the heat scale (the flaky black stuff on the steel). We also used the grinders to smooth out the shape.
This process allowed us to remove any imperfections in the steel from our unskilled hammer blows. The shape of the knife handle was modified to fit the hand better.
After the grinding operation, we also sharpened out knives on the same belt grinders, using different belts. Impressively, the end result was a shaving sharp edge!

Making A Usable Tool
Heating and beating steel stresses the steel at the molecular level and introduces weak points in the steel. To counteract this, the finished knives had to go through 3 normalising cycles. The normalizing cycles re-align the crystals in the steel to its original form, restoring the structural integrity. The process involved heating the blades to a certain temperature and then letting it air cool slowly.
The normalising process restored the steel to its original malleable state. In order to make it tough enough to hold an edge but flexible enough not to break during use, further steps were needed.
The blades were hardened by heating the steel to a certain temperature and then rapidly cooled by dunking in quenching oil. This makes the steel hard, but also brittle, which is no good for a knife.
The last process is the tempering cycle. This is to reduce some of the brittle nature of the hardened steel to make it a useable tool. The process involved heating the steel in an oven to a certain temperature and keeping it at that heat for 2 hours. Thereafter allowing it to cool slowly back to room temperature.

The end result was an extremely sharp, useful carving knife that I had forged myself from a piece of rough round bar steel!
What I Learned
The day was long, but I enjoyed every moment of it! I learned the basics and acquired the knowledge to take this skill further to improve my ability. During the training we used some modern tools such as the gas forge and the belt sanders. The other equipment used were traditional blacksmithing tools that have been used for centuries. The modern tools we used can certainly be replaced with traditional alternatives to achieve the same result. It may just take a bit more time!
I am confident that with a few basic tools and some practice, this will be a useful skill for me to apply on the homestead! Another notch on my self reliance belt!
What are you doing to upskill yourself and make yourself more self reliant? Leave a comment below, we would love to hear how you are gaining new skills!
[content-egg module=Amazon template=custom/simple_list next=4]
Get more posts like this
Subscribe to our mailing list and get interesting homesteading and green living info and updates to your email inbox.
Thank you for subscribing.
Something went wrong.


What a wonderful and useful skill to learn Frank! You are very lucky to have someone so close to teach you. Blacksmithing is something I would love to learn but I am afraid I do not have the resources to begin. Lucky you!